Power button on iPhone 4s

The power button on my old iPhone 4s (ok, I suppose I should retire this phone for something a bit more modern, but the obvious Apple upgrade in near $1000! so I am looking at China androids. Anyway) stopped working.

The Internet says it is the surface mount cable strip under the button that is likely to go wrong. I ordered one that included tools for about $5 from ebay. I ordered a new battery for another $7 at the same time as I was going to be opening up the device.

It was an exceptionally tricky repair. Much harder than replacing a laptop screen or anything except maybe when I tried to surface mount solder some RAM chips to a Palm Pilot back in 1998 (I failed, and wasted $50 worth or chips back then).

Luckily, I was a bit better this time, but the internal design is pretty close to impossible to repair, as if Steve Jobs said make it hard so it can’t be repaired, just replace.

If you are brave, there are directions to fix it here:

https://www.ifixit.com/Guide/iPhone+4S+Earpiece+Speaker+Replacement/7320

and here:

https://www.ifixit.com/Guide/iPhone+4+Power+%26+Lock+Button+Replacement/4332

Using an unlocked USB 3g dongle on a mac

The cellular telcos regularly have deals where they give away 3g/4g usb modem dongles for free or very cheap. I seem to have collected one from every network over the last few years. I also tend to churn networks pretty regularly, in an effort to keep data costs down.

At the moment, Optus Connect4Less gives me blocks of 500Mb for $5. Annoyingly, it bills in 1Mb increments, so I am flying through my quota pretty fast, but it is otherwise ok.

I have also recently come into a MacBook Air. Nice laptop, but since I haven’t use MacOS since about the end of last century, it is taking a bit to get used to.

One issue was getting a 3G connection working. The optus branded dongle sticks straight out , I much prefer the old Telstra Turbo stick with a hinged USB plug that points up. Fortunately, these are easily unlocked to take any SIM, and the drivers are available at ZTE’s site – as it is actually a ZTE MF626, specifically a MF626i to indicate the Telstra branded model. It includes dialling software with Telstra NextG logos that helpfully hides almost all useful config options. Don’t use it.

Instead, head to Network Preferences in the OS, select the ZTEUSBModem entry and enter *99# as the calling number. In advanced, under “Model” select GPRS (GSM3G). Now you can enter your network APN. For Optus, it is usually “internet”, for Voda it used to be “vfinternet”. Whirlpool has the latest details if you are not sure.

That’s it. Click apply to save the settings then Connect to try it out. Mine takes a minute or so before it is connected and the DNS is properly applied, so be patient. You can select “Show modem status in menu bar” to have a little phone icon to easily connect/disconnect in future.

Acer Aspire Bios bug is a pain

Apologies for the techy nature of this post, but I found many  people online with this issue that were clearly ignorant of how computers work, what UEFI and legacy BIOS’ do, and how they all interact. The info below has enough detail for somebody with access to a second machine and the Internet to restore an Acer laptop suffering the legacy BIOS F2 not working bug. If you stumble across it and it is too complex, rest assured your data is safe, you don’t have to reinstall everything, and you shouldn’t do that. Instead, point your helpful techy friend here to help you get working again.

My current laptop, an Acer Aspire V5 431p, is a Win8 machine that uses the UEFI standard that has superseded the BIOS firmware system used in PCs for the past few decades.
Changes to the UEFI settings are managed via Windows and necessitate a reboot into a special mode. All well and good, presumably this allows a bit more of a lock down of the system, to prevent installation of unsigned drivers, for example.
This machine has an option for backward compatibility called legacy BIOS support, so you can install an operating system that isn’t windows, or an older version of windows.
One feature that I haven’t seen well documented is the ‘secure boot’ facility that stops the machine booting into Windows 8 unless the UEFI is enabled.
I presume the rationale here is to thwart malware that targets the BIOS, although I’m not 100% clear on how completely disabling the computer is meant to assist the owner should they have a malware issue.
No doubt it helps Microsoft and the ISPs that suffer from botnet problems though, I guess.
In any case, I had cause to learn about this yesterday when I was trying to load some unsigned drivers for an unbranded China phone.
As Windows ever-so-helpfully denies installing them, with the message to visit the hardware suppliers website for signed drivers by default, with no option to override, I was faced with a computer refusing to do what I required thanks to Microsoft’s obstinence. A tip online suggesting there was a UEFI option to turn off ‘drivers must be signed’. I dived in to turn it off and decided to skip using UEFI as a boot loader as well, so I could have the old reassuring “Hit F2” option on boot up if I wanted to change anything like this again.
Sadly, due to a bug in Acer’s BIOS firmware, this was my undoing.
The PC booted through POST, displayed the “Hit F2 to enter BIOS or F12 for boot options” then ran through the boot order preference.
Of course, both the hard drive and the SSD in my machine have bootable partitions, but both happened to be Windows 8, which refused to load with an error saying No Operating System Found.
Mixed in was a brief display of some errors related to network cables/media. Hmm. That was the boot over the network option in my boot list so could be discounted. So why wouldn’t the system boot?
Hence my lesson about Secure Boot not allowing legacy BIOS boot loading.
Nothing for it by to turn UEFI back on.
Restart, hit F2. Nothing, just the same boot error message.
Try again. Restart, hit F2. Nothing, just the same boot error message.
Sometimes it can be a really short time window to hit F2, as little as 1/5th of a second I read somewhere. So I tried again. Still no good. I tried F12, and got the boot order list, so the keyboard was working.
Hmm. Google.
Many people describing similar issues, most of the threads with no answer or a description of somebody doing a complete FDISK and reinstalling. That doesn’t sound good.
I grabbed another PC and made a Unetbootin rescue disk.
Some success! The USB stick showed up in the boot list and let me boot to FreeDOS. I could also access the C: drive file system, it was still intact, so I just had to get around this secure boot issue. Which meant access to the BIOS, which meant hitting F2, which wasn’t working, thanks to a bug in Acer’s Phoenix sourced firmware.
I made a Win8 rescue disk from a spare machine. Again, it booted to the recovery tools, and allowed me to drop to a CMD and see the disk contents. I have good back ups, but at this stage I took the opportunity to copy over the last couple of files I had been working on for a presentation that evening!
How about flashing a new BIOS, I thought.
Excellent, the Acer support site shows three BIOS revisions for this machine.
Problem is, they are delivered as Windows EXE files. You need a working Windows install to run them to flash the BIOS. The support manual available online suggests the bare ROMs can be installed via a USB drive, but gives no details, presumably those are only available to Acer techs.
Grr.
So I have now reached the point where I have spent several hours trying to restore a system I can see is intact, thanks to an evil combination of a BIOS bug and Microsoft’s pedantic ‘don’t trust the user’ policies.
I have a bit of inspiration and pop a working Windows 7 HDD out of another laptop and boot from it in a USB sled. It boots!
Ignoring the pleas to install drivers and the ridiculous display resolution I run the BIOS flash program.
Version 1.2 is too old. version 2.17 flashes. Thanks, BTW Acer, for the complete lack of *any* documentation on the BIOS revisions. I am literally tinkering with the base level of my systems software, with the ability to nuke the PC forever if it fails, with a file supplied by the company whose bug got me into this place to begin with, using a file that has no documentation besides run update.bat while plugged into AC.
The machine reboots, the Win 8 spinning dots come up. Phew.
It takes many minutes and a few counts up to 100% before it is all working again, but the re-flash restored UEFI as the default boot loader and everything is good again.
Of course, I will have to go fishing in there again to load those unsigned drivers, but at least I can boot my PC.
So the lessons:
– Acer has woeful online support. Many users are complaining about this issue in the last few months, Acer response is invariably “Hitting F2 works”. It does not. It is a bug.
– Microsoft nanny-state security controls make it harder for you to do legitimate stuff with your computer, and lack of support for legacy BIOS booting wasted most of my day.
– It is this kind of thing that drives people to Linux! Might be time to check if WINE is supporting the Win progs I need yet…
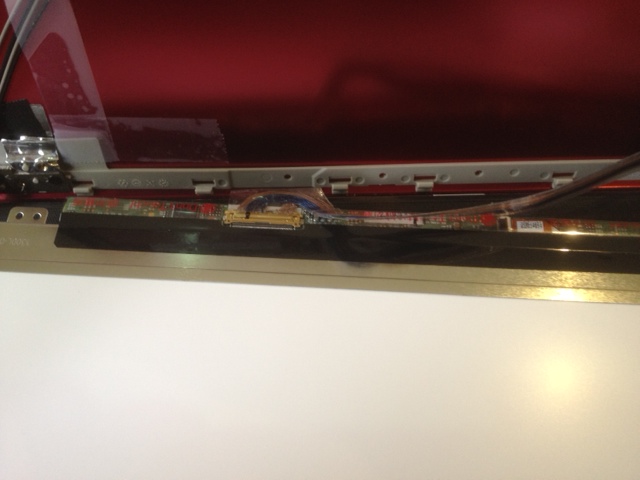
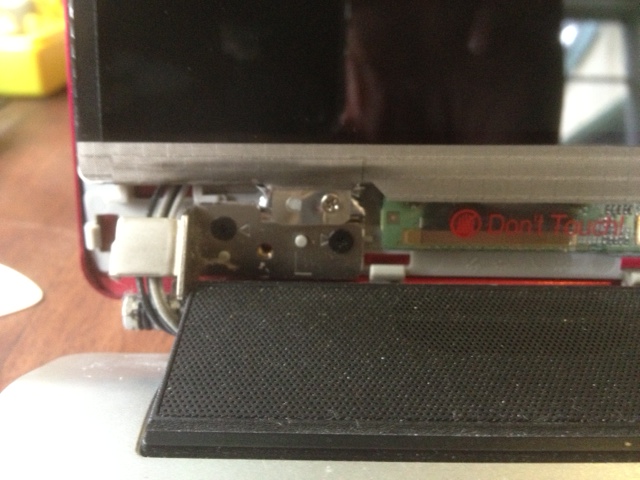
Gigabyte m1405 screen repair/replacement

So my nice 14in Gigabyte notebook has been humming along, until I picked up the satchel and it slid out – falling 50cm onto the floor edge first.

This caused a crack along the left most 10% of the screen. I lived with it for a week or so, then bit the bullet to replace it.

A place on ebay sold me a screen for $100 shipped from the USA. After doing the swap I see the part number indicated the same screen is used in some SONY and Dell notebooks, so if I break it again I’ll be using a $75 part. The part number is b140xw02 V.1 (You can buy one here from Amazon. Note I get a dollar or two if you use that link).

I couldn’t find any instructions online, so I began with a bit of trepidation. The key things to know if you are going to do this yourself:

– the screen can be replaced without disassembling any of the laptop base.

– there are four screws under the rubber plugs at the corners of the silver screen fascia.

– The silver frame can be unclipped very gently. I used guitar picks to carefully prise it forward.

– The wedge shaped hinge covers can be removed by ripping off the mirror stickers on the outersides and removing a screw. I did this, but it may be possible to leave them in place if you are very careful.

– Once the front frame is off, there are only four screws holding the screen to the red metal lid.

– The wiring harness just pushes into place with a piece of tape to hold it.

– Now put it all back together!

Just pull it free and push in the new one.
The silver screw is one of four holding the screen tabs in place. No need to remove the black ones.

Samsung CLP-300 bargain colour laser printer

Colour laser printers have a lot of benefits over inkjets, but the latest models have computer chip enforced toner contracts (so you can only buy expensive “genuine” toner). I picked up a Samsung CLP-300 2nd hand for $20 that allows generic toner. Low cost non-OEM cartridges are $20 per set on ebay delivered for 3 colours + black. This particular model, and it’s network enabled sibling the CLP-300N, suffer an annoying paper feed bug that means they are readily available for sale 2nd hand. The pick-up roller gets dirty/worn, and the paper feed fails, often sporadically. This link includes some instructions for fixing this error, and I’ve reprinted the key section below:

1- turn off and remove power cable;
2- remove paper drawer;
3- remove image unit – don not let it under sun light. cover it.
4- put the printer upside down;
5- look at the axle of the big central rubber roller:

5.1- you will see both sides have a plastic balancer and locker.
5.2- left one has a small “finger” that locks it from slide.
5.3- take your cellphone and do a photo of the present position of the axle and the pieces as you will need to remember it after.

6-light and carefully, lift this small finger from the axle and slide the locker half inch to the center;
7- after this, you have the axlee in a so so free way. You can move (rotate) it, if you lift and free the inside gear at left end;
8- at the central drum, there is two locks, one each side. If you release them, you can remove a type of a plastic shell with the rubber belt attached to.
8.1- to unlock the shell you need to rotate the axle and position the locks in a convenient way. So, rotate it again, and so, remove the shell.
9-I removed the rubber belt, washed it with water only.
when repositioning the belt on the shell, observe it and put in a different position, as the slick area fits inside the shell, so a new surface is out.
10- mount it a reverse order.

The pick-up roller itself is available as a spare part on ebay from around $9. Search for clp300 roller.

A 10 minute fix makes these good as new.

I also came across the service manual. It can be downloaded here.